If you follow Photoshop tutorials and other non-related to InDesign tutorials, then you probably know very well how to work with clipping masks. Photoshop, Flash, and Illustrator all make it very easy to create and adjust clipping mask, with very clearly marked menu options for doing the job. Making a clipping mask in an InDesign document may be challenging if you don’t know how to do it, but you’ll see that once you learn, it’s actually a much easier process than with most of the other programs. It’s certainly much easier to do in InDesign than in Photoshop, as this InDesign tutorial will demonstrate to you.
The clipping mask process takes only a few seconds in total, and is really mostly just a matter of cutting and pasting, You’ll learn how to do clipping masks from shapes and from words, and the knowledge will be extremely useful to you when you get around to trying it out.
Clipping Masks of Shapes
You’ll need a picture and a simple InDesign shape for this InDesign tutorial. The shape should be unformatted (though a small stroke around the edge is fine).
1. Select the image you want to use. Right click it and select Cut, or press Ctrl X to cut it from the document.
 2. Click on the shape. InDesign lets you easily paste the picture into the shape if you right click and select Paste Into.
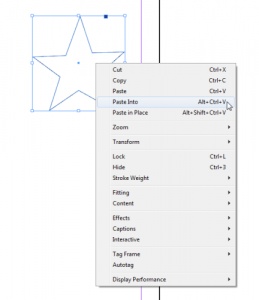 3. You’ll notice that the shape has formed a clipping mask for the image which is now inside. If you’ve done any other InDesign tutorials you’ll remember that this is just like the framing options InDesign offers.
 4. You’ll most likely need to adjust the image to fit the frame. Click the double circle in the middle of the image to be able to resize and move the image around.
 5. With that, you’ve just made yourself a great clipping mask from a shape.
Clipping Masks of Text
For the text clipping mask, the InDesign tutorial is basically the same. There are only a few steps that you must take beforehand to be able to do the process.
1. Make a text box with your text. Format it to look exactly how you’ll want it to when you decide to clip the image. (You won’t be able to change it very well later)
 2. Make sure you have the text box selected, then go to the Type Menu. Select Create Outlines.
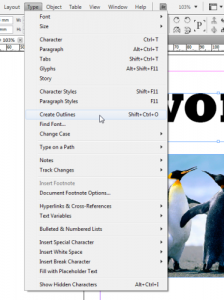 3. The text is now just a grouped collection of shapes, and you can easily add the image into it now. Follow the steps of the preceding section, cutting the image, pasting it into the frame, then resizing and moving it to give the best look. Your finished product should look something like the screenshot below.
 Clipping masks are an essential thing to know when you are a designer or layout artist, as there are always times that arise where a simple square frame isn’t enough. In times like those remember this InDesign tutorial or refer back to it if you need to.

